
How to Sand a Door with an Electric Sander: A Smooth Finish Guide
Refinishing a door can make a big difference in a room’s appearance, and using an electric sander makes the job much faster than doing it by hand. But how do you get a smooth, even finish without damaging the door?
Sanding a door with an electric sander involves preparing the door and workspace, choosing the right sander and abrasives, and using proper techniques to remove the old finish, smooth the surface, and prepare it for painting or staining. It’s a process that requires patience and attention to detail.

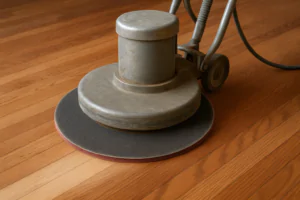
Using a random orbital sander on a door panel.
With the right approach, you can achieve professional-looking results, giving your door a fresh new look.
Can You Use an Electric Sander on Doors?
Is an electric sander suitable for delicate work like sanding a door, or is it too powerful?
Yes, you can definitely use an electric sander on doors, and it’s often the most efficient way to remove old paint or varnish and smooth the wood surface. The key is to choose the appropriate type of sander and use the correct grit abrasives for each stage of the process.

Types of electric sanders suitable for door refinishing.
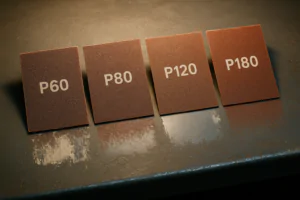
A random orbital sander is probably the most popular choice for sanding doors. Its circular motion combined with random orbits helps to prevent swirl marks, which can be a problem with other types of sanders. A random orbital sander is great for flat panels and stiles. For detailed areas like around panels or moldings, a detail sander (often shaped like an iron) or even some hand sanding might be necessary. Belt sanders are generally too aggressive for most door sanding unless you need to remove a very thick, stubborn finish on a completely flat slab door, and even then, you need to be extremely careful not to create gouges. When using any electric sander, start with a coarser grit to remove the old finish (e.g., 60 or 80 grit), then move to progressively finer grits (120, 180, 220 grit) to smooth the wood. Always keep the sander moving to avoid sanding too deeply in one spot. High-quality abrasives, such as the film sanding discs from NOVOGRIT, can provide more even sanding and last longer, which is beneficial when working on detailed surfaces like doors.
What is the Best Way to Sand a Door?
With different parts to a door – flat panels, stiles, rails, and sometimes moldings – what’s the most effective sequence and technique for sanding?
The best way to sand a door involves taking it off its hinges if possible, laying it flat, and sanding different areas (panels, rails, stiles) systematically using a combination of electric sanders and hand sanding where needed. You start with coarse grit and progress to fine, ensuring all dust is removed between grits.

Sanding a door laid horizontally on sawhorses.
Taking the door off its hinges and placing it horizontally on sawhorses makes sanding much easier and safer than trying to sand it vertically. This allows you to apply even pressure and prevents the sander from pulling away from the surface. Before starting, remove all hardware like doorknobs and hinges. Start with a random orbital sander on the largest flat areas, like the panels. Use a medium grit abrasive (like 80 or 100 grit depending on the existing finish) to remove the old paint or varnish. Work systematically, moving the sander in overlapping passes. Once the panels are done, move to the stiles (the vertical parts) and rails (the horizontal parts), using the same sander and grit. For any detailed moldings or tight corners where the random orbital sander can’t reach, switch to a detail sander, a sanding block, or sandpaper wrapped around your finger. After the first pass with the medium grit on all areas, switch to a finer grit (120 or 150) and repeat the process over the entire door. Then move to an even finer grit (180 or 220) for the final smoothing pass. Always vacuum thoroughly after each grit change to remove dust particles that could cause scratches with the next finer grit. For the final pass, lightly hand sand with the grain of the wood for the smoothest possible finish. High-quality abrasives from NOVOGRIT maintain their cutting edge longer, which is helpful when working through the different grits and shapes of a door.
How Do You Sand with an Electric Sander?
Using an electric sander effectively requires more than just turning it on. What are the key techniques for getting the best results?
Sanding with an electric sander involves selecting the right abrasive grit for the task, moving the sander smoothly and consistently over the surface with even pressure, keeping the sander flat on the material, and using dust collection to minimize airborne particles. You should work through a progression of grits, from coarse to fine.

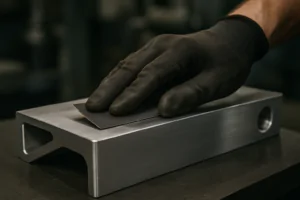
Proper technique for using an electric sander.
Before you even turn the sander on, make sure the abrasive disc or sheet is properly attached and secure. Connect the sander to a dust collection system, whether it’s a dust bag that came with the sander or a shop vacuum, as sanding generates a significant amount of fine dust. Place the sander flat on the surface before you turn it on. Turning it on while holding it in the air and then bringing it down can cause it to jump or gouge the material. Once the sander is running and flat on the surface, move it in smooth, overlapping passes. For random orbital sanders, some people recommend a circular or elliptical motion, while others prefer straight overlapping lines; the key is to keep it moving and avoid dwelling in one spot. Let the sander do the work; you don’t need to apply excessive pressure, which can overheat the motor, clog the abrasive, or create unevenness. Keep the sander flat against the surface at all times to avoid tilting it and creating uneven sanding or edge marks. When sanding with a progression of grits, ensure you have removed all the scratch marks from the previous, coarser grit before moving to the next finer one. For example, after using 80 grit, the surface should look evenly sanded by that grit before you switch to 120. Using high-quality, consistent abrasives, such as the durable film sanding discs from NOVOGRIT, helps ensure that the abrasive cuts evenly and effectively, making the sanding process smoother and more predictable.
What are the 5 most common mistakes people make with a random orbital sander?
Even with a seemingly simple tool like a random orbital sander, it’s easy to make mistakes. What are the most frequent errors users should avoid?
Five common mistakes when using a random orbital sander are: 1) Starting or stopping the sander while it’s on the surface, 2) Applying too much pressure, 3) Not using a progression of grits, 4) Failing to collect dust effectively, and 5) Using worn-out abrasive discs.

Mistakes to avoid when using a random orbital sander.
Let’s elaborate on these common errors:
-
Starting or Stopping on the Surface: As mentioned earlier, turning the sander on or off while it’s in contact with the workpiece can cause it to jump, leaving swirl marks or even gouging the surface. Always lift the sander before turning it on or off.
-
Applying Too Much Pressure: Pushing down hard on a random orbital sander doesn’t make it sand faster; it actually makes it less efficient. Excessive pressure can slow down or even stop the random orbiting action, causing the sander to simply spin in a circle. This generates heat, clogs the abrasive, and leads to prominent swirl marks that are difficult to remove. Let the weight of the sander and the sharpness of the abrasive do the work.
-
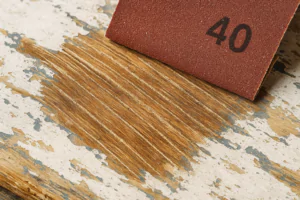
Not Using a Progression of Grits: Skipping grits (e.g., jumping from 80 to 220 grit) is a common mistake. Each grit is designed to remove the scratch pattern left by the previous, coarser grit and refine the surface. Skipping grits leaves behind deeper scratches that the finer grit cannot fully remove, resulting in a less smooth finish. Always work through a logical progression of grits.
-
Failing to Collect Dust Effectively: Sanding produces a lot of fine dust. If this dust isn’t collected (either with a bag or vacuum), it gets in the air, on the surface, and under the sander pad. Dust particles trapped under the sander can cause scratches. Effective dust collection improves visibility, reduces cleanup, and contributes to a better finish.
-
Using Worn-Out Abrasive Discs: Trying to squeeze a little more life out of a worn-out abrasive disc is counterproductive. A dull disc doesn’t cut; it rubs, generating heat, clogging easily, and potentially damaging the surface with friction marks rather than sanding effectively. Replace discs as soon as they become clogged or lose their cutting edge. Using high-quality, durable abrasive discs like those from NOVOGRIT helps you avoid needing to change discs as frequently, saving time and ensuring consistent performance.
Avoiding these common pitfalls will significantly improve your results when using a random orbital sander on a door or any other project.
Conclusion
Sanding a door with an electric sander is an effective way to refinish it, but it requires selecting the right tools and abrasives, using proper technique, and avoiding common mistakes. By taking the door off, using a progression of grits with quality abrasives like NOVOGRIT, and keeping the sander moving, you can achieve a smooth surface ready for a new finish.

You may also be interested in:

What is the difference between zirconium, ceramic, and aluminum oxide abrasives?
Choosing the right abrasive can be confusing. Using the wrong one wastes time, ruins your workpiece, and costs you money. Let’s make the choice simple for you. The main difference

Best Sandpaper for Aluminum: NOVOGRIT's Guide to Flawless Finishes
What is the Best Type of Sandpaper to Use on Aluminum? Do you find yourself frustrated by sandpaper that gums up instantly when you try to smooth aluminum? It is
Best Sandpaper for Paint Removal: Grits, Types, & Tips | NOVOGRIT
What is the Best Sandpaper for Removing Paint? Are you tired of staring at chipped, peeling paint on your furniture, walls, or even your car? It's a common problem, and
Automotive Wet Sanding: Supplies, Liquids & Best Sandpaper
Automotive Wet Sanding Supplies: What Do You Really Need? Wet sanding is a crucial technique in automotive refinishing, used to achieve a flawlessly smooth surface before painting or polishing. Unlike
Best Sandpaper for Paint Removal & Grit Guide
What Is the Best Sandpaper for Removing Paint? Removing old paint can be a tedious job, but using the right sandpaper makes all the difference. It's not just about grit;
Hardwood Floor Sanding: Screen vs. Sandpaper & Best Practices
Sanding Screen vs. Sandpaper for Hardwood Floors: Which is Best? When you're tackling hardwood floor projects, choosing the right abrasive is crucial for achieving a smooth, professional finish. Both sanding
Paper Backing vs. Mesh Sanding Discs: Which Abrasive to Choose?
Paper Back vs. Mesh Sanding Discs: Which One Should You Pick? Choosing the right sanding disc backing can significantly impact your project's efficiency and finish quality. Paper-backed discs are a
Sanding Mesh vs Paper: Which is More Economical and Better?
Is Sanding Mesh More Economical Than Sandpaper? Comparing Abrasive Costs When stocking up on abrasives, cost is always a factor. Paper sandpaper has traditionally been the standard, but newer mesh
Sanding Nets & Screens Use Cases: When to Choose Mesh Abrasives
Sanding Nets and Screens: What Are Their Best Use Cases? When you encounter sanding nets or screens, you might wonder where they fit into your sanding projects. Unlike traditional solid-backed
