
How to Maintain Your Sanding Belts: Keep Them Cutting Like New
Sanding belts don’t last forever, but you can significantly extend their life and keep them performing well with proper maintenance. Neglecting your belts leads to slower work, poor finishes, and wasted abrasives. Taking a little time for care makes a big difference.
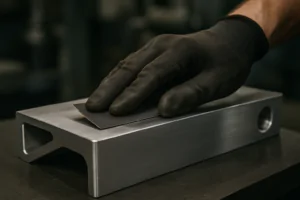
Maintaining your sanding belts primarily involves keeping them clean to prevent clogging with dust and debris, ensuring proper tension and tracking on the sander, and using them correctly with appropriate pressure and speed for the material being sanded. Proper storage also prevents damage.

Cleaning debris off a sanding belt.
Regular maintenance helps your belts cut more efficiently, last longer, and produce consistent results.
What maintenance does a belt sander need?
Beyond just changing the belt, what maintenance is required for the belt sander itself to ensure optimal belt performance?
Maintaining a belt sander involves regularly cleaning dust and debris from inside the housing, checking and adjusting the belt tracking mechanism for proper alignment, inspecting the platen and rollers for wear or damage, lubricating moving parts if recommended by the manufacturer, and ensuring the power cord and plug are in good condition. Proper sander maintenance directly impacts how well the sanding belts perform and their lifespan.

Cleaning dust from the inside of a belt sander.
A well-maintained sander is crucial for getting the best performance from your sanding belts. Dust is the enemy of power tools, especially sanders. It can build up inside the housing, clogging vents, interfering with moving parts, and even damaging the motor over time. Regularly using compressed air or a vacuum to clean out the sander is essential. The belt tracking mechanism ensures the belt runs straight on the rollers. If the belt drifts to one side, it can rub against the housing, causing wear on both the belt edge and the sander, and it can make the sander difficult to control. Most belt sanders have an adjustment knob or screw for tracking; learning how to use it keeps the belt centered. The platen, the flat surface behind the belt that supports it during sanding, can wear down, especially around the edges. Worn rollers can also cause the belt to track incorrectly or not spin smoothly. Inspecting these parts for wear and replacing them if necessary is important. Some sanders have bearings or other moving parts that may require occasional lubrication according to the manufacturer’s instructions. Finally, always check the power cord for cuts or damage and the plug for bent prongs to ensure electrical safety. A smooth-running, properly adjusted sander allows the sanding belt, whether a standard type or a high-performance NOVOGRIT belt, to perform as intended and last longer.
How do you revive a sanding belt?
When a sanding belt starts to lose its cutting ability, can you "revive" it, and how is that done?
You can often "revive" a clogged sanding belt by cleaning the accumulated dust, resin, or debris from between the abrasive grains. The most common method is using a sanding belt cleaning stick, which is a block of natural rubber or similar material. While the belt is running on the sander, you press the cleaning stick against the belt’s surface, and the friction and stickiness pull the embedded particles out of the abrasive.

Cleaning a sanding belt with a rubber stick.
Sanding belts primarily lose their effectiveness not because the abrasive grains are dull, but because the spaces between the grains get clogged with the material being sanded. This is especially true when sanding wood with a lot of resin or finishes. The embedded material fills the gaps, preventing the abrasive particles from contacting and cutting the workpiece. A sanding belt cleaning stick is specifically designed to address this. It’s a block of a firm, gummy material, usually natural rubber. With the sander running at its normal speed (be careful and wear gloves!), you firmly press the cleaning stick against the surface of the moving belt. The stick heats up slightly from the friction and becomes tacky. As the abrasive surface passes over the stick, the embedded dust, resin, and other debris stick to the rubber and are pulled out of the belt’s surface. You’ll see the stick quickly accumulate a layer of the material that was clogging the belt. Move the stick across the entire width of the belt and repeat if necessary until the belt looks cleaner. This process can significantly restore the belt’s cutting ability and extend its usable life. It’s a simple, inexpensive tool that is highly effective for maintaining your belts. Even high-quality NOVOGRIT belts, while designed to resist clogging, will benefit from occasional cleaning when working with materials that produce sticky dust.
How do you clean a sanding belt?
What is the specific process for cleaning a sanding belt using the most common method?
To clean a sanding belt using a cleaning stick, first, ensure the belt is installed correctly on your belt sander and that the sander is stable. With the sander running at its normal operating speed, hold the sanding belt cleaning stick firmly but with moderate pressure against the surface of the moving belt. Slowly move the stick back and forth across the width of the belt, allowing the stick’s surface to pick up embedded dust and debris. Continue until the belt appears visibly cleaner and the stick is covered in the removed material, rotating or cutting the used portion of the stick if necessary.

Following the steps to clean a sanding belt.
Safety is important when cleaning a running sanding belt. Always wear safety glasses. If you are holding a portable belt sander, make sure it is firmly secured or clamped to a workbench to prevent it from moving while you apply the stick. Turn the sander on and let it get up to speed. Take your sanding belt cleaning stick, which looks like a block of firm eraser material, and hold it against the surface of the moving belt. You don’t need excessive pressure, just enough to create friction and allow the rubber to grab the debris. As you apply pressure, you’ll see the stick begin to pick up the material embedded in the belt. Move the stick slowly back and forth across the entire width of the belt to clean the whole surface. The stick will quickly become coated with a layer of dust and debris. You can rotate the stick to use a clean edge, or if it’s a large block, you can sometimes cut off the used portion to expose a fresh surface. Continue cleaning until you see that the belt is much cleaner between the abrasive grains. You can tell the belt is revived because it will start cutting more aggressively again. This simple cleaning method extends the life of your belts and keeps them working efficiently.
How often do you need to change a sanding belt?
Is there a set timeframe or indicator for when a sanding belt needs to be replaced rather than just cleaned?
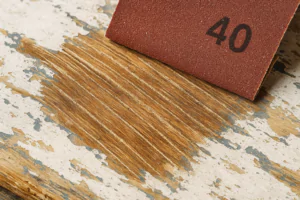
You need to change a sanding belt when it no longer cuts effectively, even after cleaning. Indicators that a belt needs changing include significantly slower material removal, the belt feeling smooth or worn down rather than sharp, fraying or damage to the edges or splice, or the belt breaking. There is no fixed time; it depends entirely on the type of belt, the material being sanded, the grit used, and the amount of use.

Recognizing when a sanding belt needs replacement.
Knowing when to change a sanding belt is crucial for efficient work. Trying to use a worn-out belt is frustrating and unproductive. The most obvious sign is when the belt stops removing material at a reasonable rate. If you’re applying normal pressure and the sanding isn’t progressing, the belt is likely dull or irreversibly clogged. Even after cleaning with a rubber stick, if the abrasive grains are truly worn down or broken off, the belt won’t cut effectively. Feel the surface of the belt; it should feel sharp and abrasive. If it feels smooth, it’s time for a new one. Inspect the belt for physical damage. Fraying edges, especially on cloth-backed belts, can make the belt unstable and prone to breaking. Damage to the splice, the joint where the belt is formed into a loop, is a common point of failure. If the splice looks like it’s separating, replace the belt immediately before it breaks catastrophically while spinning at high speed. A broken belt is not only useless but can be a safety hazard. High-quality belts, like those offered by NOVOGRIT, are designed for durability, but even the best abrasives eventually wear out. Pay attention to the performance and condition of your belt, and replace it proactively when its effectiveness declines. It’s often more cost-effective in terms of labor time to use a fresh belt than to struggle with a worn one.
Conclusion
Maintaining sanding belts by regular cleaning with a rubber stick and keeping your belt sander clean and properly adjusted significantly extends belt life and performance. Replacing belts when they are worn or damaged, regardless of cleaning, is essential for efficient, safe, and effective sanding.

You may also be interested in:

What is the difference between zirconium, ceramic, and aluminum oxide abrasives?
Choosing the right abrasive can be confusing. Using the wrong one wastes time, ruins your workpiece, and costs you money. Let’s make the choice simple for you. The main difference

Best Sandpaper for Aluminum: NOVOGRIT's Guide to Flawless Finishes
What is the Best Type of Sandpaper to Use on Aluminum? Do you find yourself frustrated by sandpaper that gums up instantly when you try to smooth aluminum? It is
Best Sandpaper for Paint Removal: Grits, Types, & Tips | NOVOGRIT
What is the Best Sandpaper for Removing Paint? Are you tired of staring at chipped, peeling paint on your furniture, walls, or even your car? It's a common problem, and
Automotive Wet Sanding: Supplies, Liquids & Best Sandpaper
Automotive Wet Sanding Supplies: What Do You Really Need? Wet sanding is a crucial technique in automotive refinishing, used to achieve a flawlessly smooth surface before painting or polishing. Unlike
Best Sandpaper for Paint Removal & Grit Guide
What Is the Best Sandpaper for Removing Paint? Removing old paint can be a tedious job, but using the right sandpaper makes all the difference. It's not just about grit;
Hardwood Floor Sanding: Screen vs. Sandpaper & Best Practices
Sanding Screen vs. Sandpaper for Hardwood Floors: Which is Best? When you're tackling hardwood floor projects, choosing the right abrasive is crucial for achieving a smooth, professional finish. Both sanding
Paper Backing vs. Mesh Sanding Discs: Which Abrasive to Choose?
Paper Back vs. Mesh Sanding Discs: Which One Should You Pick? Choosing the right sanding disc backing can significantly impact your project's efficiency and finish quality. Paper-backed discs are a
Sanding Mesh vs Paper: Which is More Economical and Better?
Is Sanding Mesh More Economical Than Sandpaper? Comparing Abrasive Costs When stocking up on abrasives, cost is always a factor. Paper sandpaper has traditionally been the standard, but newer mesh
Sanding Nets & Screens Use Cases: When to Choose Mesh Abrasives
Sanding Nets and Screens: What Are Their Best Use Cases? When you encounter sanding nets or screens, you might wonder where they fit into your sanding projects. Unlike traditional solid-backed
