How to choose the grit of sandpaper?
Choosing sandpaper grit feels simple, but the wrong choice wastes time and ruins your work. It leads to frustration and poor finishes every time you sand.
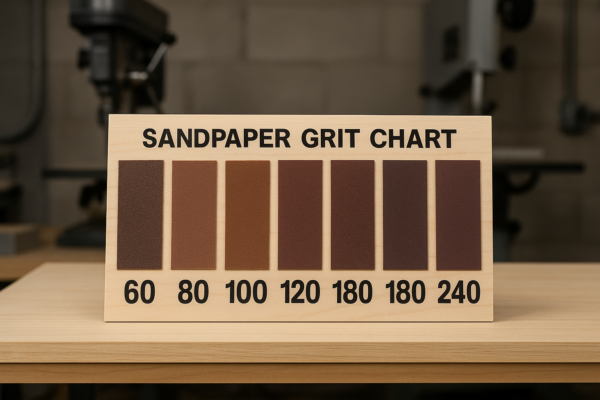
Sandpaper grit numbers tell you the size of the abrasive particles. A lower number means bigger particles, which remove more material quickly. A higher number means smaller particles, giving you a smoother finish.
Knowing the right grit for your project saves you effort and gives you great results. It helps you get the perfect finish, whether you work with wood, metal, or paint.
How to know what sandpaper grit to use?
Facing a wall of sandpaper choices can feel overwhelming. You worry about picking the wrong one and damaging your material or getting a bad finish.
The right sandpaper grit depends on your material, the finish you want, and what you need to do. Are you removing old paint, shaping wood, or smoothing a surface? Each job needs a different grit.
Picking the first sandpaper you see often leads to problems. Understanding how grits work helps you choose smarter. You match the sandpaper to the task at hand.
Choosing Grit by Task and Material
Picking the right grit is like choosing the right tool for a specific job. I learned this early in my years working with abrasives. [Insert Personal Story Here about a time the wrong grit caused a problem, perhaps in a factory setting or demonstrating to a client] It makes a big difference in how fast you work and the final quality. Different tasks need different grit ranges. Materials also matter. Wood needs one approach, metal another. Paint needs careful handling. We see our clients in furniture and automotive aftermarket use specific grit sequences for best results. Consistency in grit size is key for them. Our R&D ensures our grit is uniform. This lets users move from one grit to the next predictably.
- Coarse Grits (40-80): These remove material fast. Use them for stripping paint, removing deep scratches, or rough shaping wood. They leave a rough surface.
- Medium Grits (100-150): These smooth surfaces after using coarse grits. They remove planing marks or moderate imperfections. They prepare the surface for finer sanding.
- Fine Grits (180-320): Use these for final smoothing before applying finishes like paint or varnish. They create a smooth feel. For some materials, this is the final step.
- Very Fine Grits (360+): These are for polishing or sanding between coats of finish. They create a very smooth, almost polished surface.
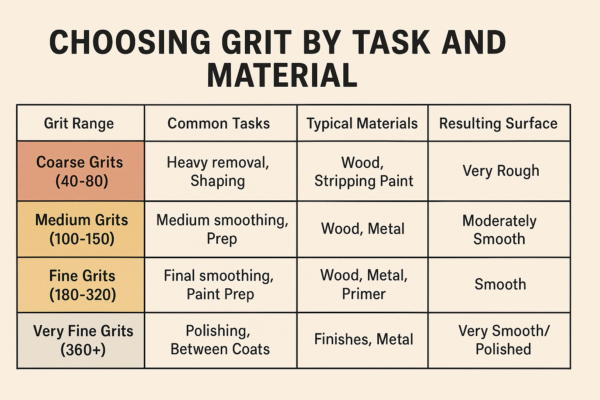
It is important to start with a coarse grit if you have a lot to remove. Then you move to progressively finer grits. This process refines the surface step by step. You remove the scratches from the previous, coarser grit with the next finer one. This table helps you see typical uses:
| Grit Range | Common Tasks | Typical Materials | Resulting Surface |
|---|---|---|---|
| 40-80 | Heavy removal, Shaping | Wood, Stripping Paint | Very Rough |
| 100-150 | Medium smoothing, Prep | Wood, Metal | Moderately Smooth |
| 180-320 | Final smoothing, Paint Prep | Wood, Metal, Primer | Smooth |
| 360+ | Polishing, Between Coats | Finishes, Metal | Very Smooth/Polished |
Understanding this progression helps you avoid skipping steps. Skipping steps means you might not remove the deeper scratches from coarser grits. These scratches can show through your final finish. Our quality control ensures each grit performs as expected. This allows our clients to follow these steps with confidence. They know the 120 grit will correctly remove the 80 grit scratches. This consistency is vital for professional finishes.
Is 220 grit too fine for painting?
You finished sanding and your surface feels smooth, but is it ready for paint? You might worry if 220 grit is too smooth, thinking the paint won't stick.
No, 220 grit is generally not too fine for painting. It is often an ideal grit for final surface preparation before applying primer or paint. It creates a smooth surface while leaving enough profile for good paint adhesion.
Using the right grit before painting is crucial for a durable and good-looking finish. If the surface is too rough, sanding marks show through. If it is too smooth, the paint might chip or peel easily.
Why 220 Grit is Good for Paint Prep
Preparing a surface for paint requires careful steps. The goal is a smooth surface. But it also needs a little bit of 'tooth' for the paint to grip. I learned this from working closely with clients in the automotive refinishing sector. [Insert Personal Story Here about a specific paint adhesion challenge a client faced and how proper sanding helped] They need paint to stick perfectly under tough conditions. 220 grit sandpaper hits a sweet spot. It removes minor flaws and provides a consistent surface texture. It is fine enough that the tiny scratches it leaves are not visible through most primers and paints. But it is coarse enough to create micro-abrasions. These micro-abrasions give the paint something to bond with. Think of it like tiny valleys for the paint to flow into and grip. If the surface is polished completely smooth (like with very high grits), the paint has nothing to hold onto. It sits on top rather than gripping the surface.
Risks of Other Grits
- Using grits coarser than 180-220: You risk leaving visible scratches. Paint is thin, especially base coats. These scratches will show. This means more work later or a bad finish.
- Using grits much finer than 220 (e.g., 400+): You might create a surface too smooth. The paint might not adhere well. It could lead to peeling or poor durability. This is especially true for surfaces that see wear, like furniture or car parts.
Most paint and primer manufacturers recommend a final sanding step in the 180 to 240 grit range before application. 220 grit falls right in this range. For some very specific applications or coatings, a slightly different grit might be recommended. Always check the paint manufacturer's guidelines if possible. Using a high-quality abrasive at 220 grit ensures consistent scratch pattern. This consistency helps achieve reliable paint adhesion every time. It removes uncertainty for our clients. Our careful production processes ensure our 220 grit is always true 220 grit. This is vital for achieving the high standards needed in automotive or furniture finishing.
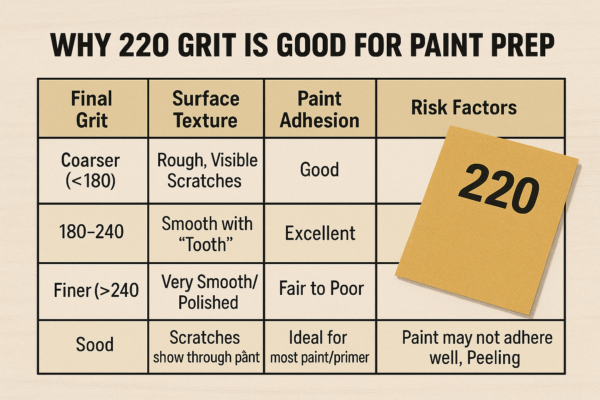
| Final Grit | Surface Texture | Paint Adhesion | Risk Factors |
|---|---|---|---|
| Coarser (<180) | Rough, Visible Scratches | Good | Scratches show through paint |
| 180-240 | Smooth with 'Tooth' | Excellent | Ideal for most paint/primer |
| Finer (>240) | Very Smooth/Polished | Fair to Poor | Paint may not adhere well, Peeling |
So, using 220 grit for your final sanding before painting is usually a good decision. It prepares the surface well. It helps the paint stick properly.
Is 80 or 120 grit rougher?
Looking at the numbers, it might not be clear which sandpaper cuts more aggressively. Does a higher number mean rougher? Or is it the other way around?
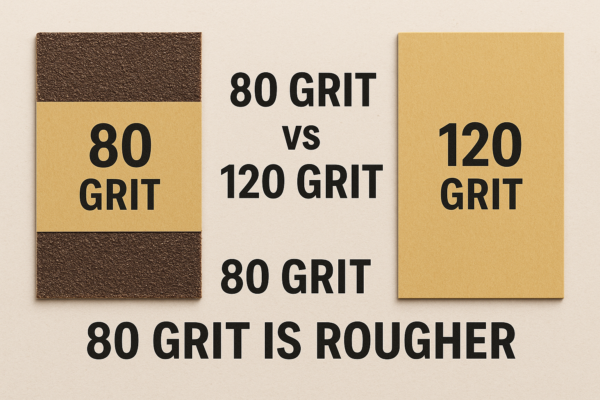
80 grit sandpaper is rougher than 120 grit sandpaper. The lower the grit number, the larger the abrasive particles are. Larger particles cut deeper and remove material faster.
Understanding this simple rule about grit numbers helps you pick the right sandpaper quickly. You know immediately if you need to remove a lot of material or just start smoothing.
Grit Number and Particle Size
The grit number on sandpaper relates directly to the size of the abrasive grains on its surface. This is something we focus on heavily in our factory in Hai'an City. [Insert Personal Story Here about the process of sizing abrasive grains or a client project requiring very specific grit performance] The numbers come from sieving processes. A higher number means the particles pass through a sieve with more holes per square inch. More holes mean smaller holes. So, higher number means smaller particles. A lower number means the particles pass through a sieve with fewer holes. Fewer holes mean bigger holes. So, lower number means larger particles.
Uses of 80 Grit
80 grit is a coarse sandpaper. It is used for aggressive tasks.
- Removing old paint or varnish quickly.
- Shaping wood or removing large amounts of material.
- Leveling uneven surfaces.
- Removing deep scratches from previous work (like from a planer).
It leaves a surface with visible scratches. This surface is not ready for finish. You must follow up with finer grits after using 80 grit.
Uses of 120 Grit
120 grit is a medium sandpaper. It is less aggressive than 80 grit.
- Smoothing the surface after using coarser grits (like 80 grit).
- Removing smaller imperfections.
- Initial sanding of bare wood or metal.
- Preparing surfaces for priming or sealing when a slightly coarser base is acceptable.
120 grit leaves a smoother surface than 80 grit. But it will still leave scratches that might show through a final finish. You typically move to 180 grit or finer after using 120 grit.
The Importance of Grit Progression
You usually do not start with 80 grit and jump straight to 220 grit. That does not work well. The 220 grit will struggle to remove the deep scratches left by the 80 grit. You need to progress through the grits. Start with 80 if needed, then move to 120, then maybe 150, then 180, then 220. Each step removes the scratches from the previous step. Using consistent, high-quality abrasives at each step is important. Our production lines ensure that our 80 grit cuts like 80 grit and our 120 grit cuts like 120 grit. This reliability helps professionals achieve predictable results every time they sand. Our clients rely on this consistency for their production lines and repair work.
| Grit Number | Particle Size | Roughness | Primary Use Case |
|---|---|---|---|
| 80 | Larger | Rougher | Heavy Stock Removal, Shaping |
| 120 | Smaller | Medium Rougher | Initial Smoothing, Prep |
So, remember: lower number equals rougher. 80 grit is rougher and removes more material than 120 grit.
Conclusion
Choosing the correct sandpaper grit is essential for any project. It depends on the task, material, and desired finish. Understand grit numbers: lower means rougher, higher means finer.

You may also be interested in:
Avoid These Mistakes When Buffing Stainless Steel for a Perfect Finish
Common Mistakes in Stainless Buffing Process: How to Avoid Them Buffing stainless steel can achieve a stunning, reflective surface. But it's also a process where mistakes can easily happen, leading
How to Maintain Buffed Stainless Steel: Tips for Keeping the Shine
Maintenance Tips for Buffed Stainless Steel: Keep That Shine Buffed stainless steel looks amazing. It has a beautiful, sleek finish that adds a touch of class to appliances, fixtures, and
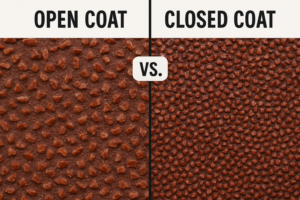
Open vs. Closed Coated Abrasives: Key Differences and Uses
Open vs. Closed Coated Abrasives: Which Should You Use? When you're looking at sandpaper or sanding discs, you might see terms like "open coat" or "closed coat." These aren't just
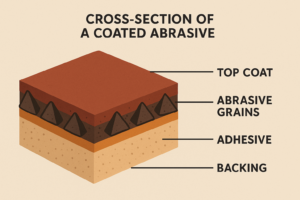
What is a Coated Abrasive? Types, Uses & Differences
What is a Coated Abrasive? Understanding This Key Tool If you've ever smoothed wood, polished metal, or prepped a surface for painting, you've likely used an abrasive. But abrasives come

How to Sand a Ceiling: Easiest Way, Best Sander & Tips
How to Sand a Ceiling: Getting a Smooth Surface Overhead Sanding a ceiling is one of those jobs nobody looks forward to. It's messy, requires working overhead, and can quickly
How to Sand a Door with an Electric Sander: Tips & Mistakes to Avoid
How to Sand a Door with an Electric Sander: A Smooth Finish Guide Refinishing a door can make a big difference in a room's appearance, and using an electric sander

Choosing Abrasive Manufacturers: A Guide to Quality and Types
How to Choose Abrasive Manufacturers: Finding the Right Partner Choosing the right abrasive manufacturer is crucial whether you're a distributor, a hardware store owner, or a large industrial user. The

How Sandpaper is Made: From Raw Materials to Finished Abrasives
How is Abrasive Paper Made? Unveiling the Sandpaper Process You use it to smooth wood, metal, or other surfaces, but have you ever wondered how that sheet of abrasive paper
How to Sand Old Hardwood Floors: Best Methods & Tips
How to Sand Old Hardwood Floors: A Step-by-Step Guide Old hardwood floors add character and warmth to a home, but after years of use, they can become scratched, worn, and

Car Painting Prep: Essential Sanding Steps Before and After Paint
What Steps are Needed for Sanding Before Painting a Car? Painting a car is a big job, and the final finish quality depends heavily on how well you prepare the