
What Steps are Needed for Sanding Before Painting a Car?
Painting a car is a big job, and the final finish quality depends heavily on how well you prepare the surface beforehand. Sanding is a critical part of that preparation.
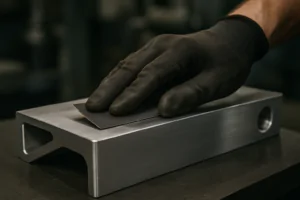
Sanding before painting a car is essential for creating a smooth, uniform surface that the new paint can adhere to properly. It involves removing old paint, rust, and imperfections, and then progressively smoothing the surface with finer grits of sandpaper.

Sanding a car panel to prepare for paint.
Proper sanding is not just about making the surface smooth; it’s about creating the right "tooth" or texture for the primer and paint to grip onto. Skipping or rushing the sanding steps will almost certainly lead to a poor paint job that could fail prematurely.
What is the Sanding Process Before Painting a Car?
Painting a car isn’t just about spraying on new color. What exactly does the sanding process involve before you even get to that point?
The sanding process before painting a car typically begins with removing all old paint, primer, and rust down to bare metal or a sound factory finish. Then, body filler is applied and shaped if needed. Finally, the entire area to be painted is sanded with progressively finer grits to achieve a smooth, uniform surface ready for primer and paint.

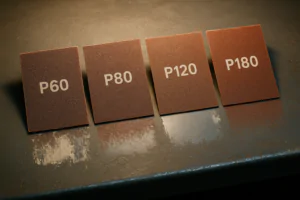
Stages of preparing a car panel for paint.
The first step is often stripping the old finish. This might involve using chemical paint strippers or mechanical methods like sanding or grinding. For significant rust or damage, you might need to grind down to bare metal. Once the old finish is removed and any body work (like dent repair or filler application) is complete, the real sanding process begins. If body filler was used, it needs to be sanded to blend seamlessly with the surrounding metal. This usually starts with a coarse grit, perhaps 80 or 120 grit, to shape the filler, and then progresses to finer grits to smooth it out. The entire area that will be painted, including the areas around the repair and the rest of the panel, needs to be sanded. This is called "scuffing" or "keying" the surface, which provides adhesion for the new primer and paint. You’ll typically start with a medium grit, like 180 or 220, to remove any remaining imperfections and create a uniform scratch pattern. Then, you’ll move to finer grits, such as 320 or 400, to smooth out the scratches from the previous grit. For optimal adhesion of primer, a surface sanded with 320 or 400 grit is generally recommended. Using high-quality sandpaper and sanding discs from NOVOGRIT ensures consistent scratch patterns and efficient material removal, which is crucial for a professional-looking paint job.
What is the Best Way to Sand Off Car Paint?
Removing old car paint can be a time-consuming task. What’s the most effective approach to get it off efficiently?
The best way to sand off car paint depends on the amount of paint to be removed and the condition of the underlying metal. For large areas or multiple layers of paint, using a power sander with a coarse grit sanding disc or a stripping disc is usually the fastest and most efficient method.

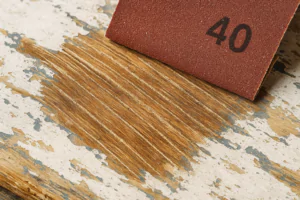
Removing old car paint with a power sander.
For complete paint removal down to bare metal, power tools significantly reduce the time and effort required compared to hand sanding. An orbital sander fitted with a coarse grit sanding disc (e.g., 40 or 60 grit) is effective for removing paint and primer. Stripping discs, also known as clean and strip discs, are even more aggressive and are designed to remove paint, rust, and epoxy coatings without removing much of the underlying metal. These are often used with angle grinders. For smaller areas or detailed work, hand sanding with coarse grit sandpaper can be necessary. Chemical paint strippers are another option and can be very effective for lifting paint from intricate areas or large flat surfaces, but they require careful handling and proper ventilation. When mechanically sanding off paint, it’s important to apply even pressure and keep the sander moving to avoid creating low spots or heat buildup, which can warp the metal. Wearing a dust mask or respirator is essential because old car paint can contain hazardous materials, like lead. NOVOGRIT offers durable sanding discs and stripping discs designed for aggressive paint and rust removal on metal, helping to make this challenging task more manageable.
How to Sand a Car After Paint?
Sanding isn’t just done before painting. You might need to sand after the paint is applied too. Why and how is this done?
Sanding a car after paint, specifically after the clear coat has been applied, is done to remove imperfections like dust nibs, orange peel texture, or runs, and to create a perfectly smooth surface for polishing. This process is called color sanding or wet sanding and uses very fine grits of sandpaper.

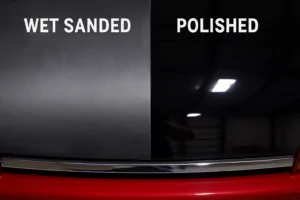
Wet sanding a freshly painted car panel.
Sanding after painting is typically done on the clear coat layer after it has fully cured. The goal is to flatten the clear coat surface. Even in a clean environment, small dust particles can land on the wet paint or clear coat, creating tiny bumps called "dust nibs." Orange peel is a texture that resembles the skin of an orange, caused by the paint not flowing out perfectly smooth. Runs are thicker areas where the paint has sagged. Wet sanding, or color sanding, uses very fine grit sandpaper with water as a lubricant. The water helps to keep the surface cool, prevents the sandpaper from clogging, and helps to carry away the sanding debris. You start with a relatively fine grit, like 1500 or 2000 grit, to level out the imperfections. For more severe orange peel or runs, you might need to start with 1000 or 1200 grit, but you need to be very careful not to sand through the clear coat. After sanding with the initial fine grit, you progressively move to even finer grits, such as 2500, 3000, or even higher, to remove the sanding scratches. High-quality wet/dry sandpaper from NOVOGRIT is essential for this process. The surface will look dull after wet sanding, but the subsequent polishing steps will bring back the gloss and create a mirror-like finish. This process requires a lot of patience and a careful touch.
What are the Proper Steps to Painting a Car?
Sanding is just one part of the overall process. What are all the steps involved in properly painting a car?
The proper steps to painting a car involve thorough preparation, including cleaning, rust and dent repair, stripping old paint, sanding with progressively finer grits, applying primer, sanding the primer, applying the base coat color, applying the clear coat, and finally, wet sanding and polishing the clear coat.

Key steps in the car painting process.
Here is a breakdown of the general process:
- Preparation: Thoroughly wash the car and remove all trim, lights, and bumpers that won’t be painted. Mask off everything that should not be painted using masking paper and tape.
- Surface Repair: Address any rust spots by grinding them out and treating the metal. Repair dents using body hammers and dollies, and apply body filler if necessary to smooth out imperfections.
- Stripping/Sanding: Remove old paint, primer, and filler as needed. Sand the entire area to be painted with progressively finer grits using appropriate sandpaper and tools, like NOVOGRIT sanding discs, to create a smooth and properly prepared surface.
- Cleaning: Clean the surface thoroughly with wax and grease remover and a tack cloth to ensure it is free of contaminants and dust.
- Priming: Apply a suitable automotive primer. Primer provides a uniform base, fills minor imperfections, and improves adhesion of the base coat.
- Sanding Primer: Once the primer is dry, sand it smooth, typically with fine grits like 320 or 400 grit, to create a perfectly level surface for the color coat. Clean again.
- Applying Base Coat: Apply thin, even coats of the base coat color. Allow proper flash time between coats as recommended by the paint manufacturer.
- Applying Clear Coat: Once the base coat has dried according to the manufacturer’s instructions, apply several coats of clear coat. The clear coat provides protection, depth, and gloss to the paint.
- Wet Sanding and Polishing: After the clear coat is fully cured (this can take several days or even weeks depending on the product and conditions), wet sand the clear coat with very fine grits (1500 grit and higher) to remove imperfections and achieve a flat surface. Then, polish the surface using rubbing compounds and polishes to restore the gloss and achieve a mirror-like finish.
- Reassembly: Reinstall all trim, lights, and other components that were removed.
Each step requires attention to detail and the use of appropriate materials and techniques for a successful car paint job.
Conclusion
Sanding is a cornerstone of car painting, both before and after the paint is applied. By carefully following the steps, using the right grits and tools, and choosing quality abrasives like NOVOGRIT, you can achieve a professional-level paint finish on your car.

You may also be interested in:

What is the difference between zirconium, ceramic, and aluminum oxide abrasives?
Choosing the right abrasive can be confusing. Using the wrong one wastes time, ruins your workpiece, and costs you money. Let’s make the choice simple for you. The main difference

Best Sandpaper for Aluminum: NOVOGRIT's Guide to Flawless Finishes
What is the Best Type of Sandpaper to Use on Aluminum? Do you find yourself frustrated by sandpaper that gums up instantly when you try to smooth aluminum? It is
Best Sandpaper for Paint Removal: Grits, Types, & Tips | NOVOGRIT
What is the Best Sandpaper for Removing Paint? Are you tired of staring at chipped, peeling paint on your furniture, walls, or even your car? It's a common problem, and
Automotive Wet Sanding: Supplies, Liquids & Best Sandpaper
Automotive Wet Sanding Supplies: What Do You Really Need? Wet sanding is a crucial technique in automotive refinishing, used to achieve a flawlessly smooth surface before painting or polishing. Unlike
Best Sandpaper for Paint Removal & Grit Guide
What Is the Best Sandpaper for Removing Paint? Removing old paint can be a tedious job, but using the right sandpaper makes all the difference. It's not just about grit;
Hardwood Floor Sanding: Screen vs. Sandpaper & Best Practices
Sanding Screen vs. Sandpaper for Hardwood Floors: Which is Best? When you're tackling hardwood floor projects, choosing the right abrasive is crucial for achieving a smooth, professional finish. Both sanding
Paper Backing vs. Mesh Sanding Discs: Which Abrasive to Choose?
Paper Back vs. Mesh Sanding Discs: Which One Should You Pick? Choosing the right sanding disc backing can significantly impact your project's efficiency and finish quality. Paper-backed discs are a
Sanding Mesh vs Paper: Which is More Economical and Better?
Is Sanding Mesh More Economical Than Sandpaper? Comparing Abrasive Costs When stocking up on abrasives, cost is always a factor. Paper sandpaper has traditionally been the standard, but newer mesh
Sanding Nets & Screens Use Cases: When to Choose Mesh Abrasives
Sanding Nets and Screens: What Are Their Best Use Cases? When you encounter sanding nets or screens, you might wonder where they fit into your sanding projects. Unlike traditional solid-backed
