
What Is the Best Sandpaper for Removing Paint?
Removing old paint can be a tedious job, but using the right sandpaper makes all the difference. It’s not just about grit; the type of abrasive and backing matters too. So, what’s the go-to choice for stripping paint effectively?
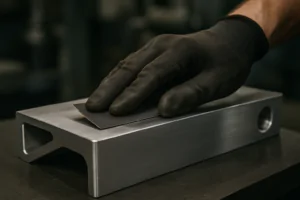
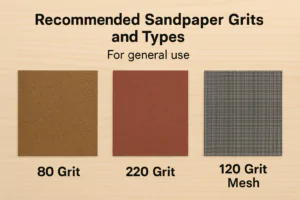
The best sandpaper for removing paint often depends on the paint’s age, type, and the surface underneath. For aggressive removal of thick, old, or stubborn paint layers, a coarse-grit (e.g., 40-80 grit) sandpaper with an Aluminum Oxide or Zirconia Alumina abrasive is highly effective due to its durability and cutting power. For thinner layers or when sanding delicate surfaces, a finer grit (e.g., 100-150 grit) may be more suitable. Additionally, a "no-load" or stearated sandpaper (often recognized by its white or light color) is excellent as it resists clogging with paint dust, significantly extending its usable life and efficiency during paint removal tasks.

No-load sandpaper resists clogging when removing paint.
Selecting the right abrasive helps ensure efficient paint removal without damaging the underlying material.
Should I use 400 or 600 grit before paint?
Prepping a surface properly before painting is crucial for a smooth, lasting finish. But is a super-fine grit like 400 or 600 necessary, or even beneficial, before applying paint?
No, using 400 or 600 grit sandpaper is generally too fine for sanding before applying paint, especially the first coat (primer or base coat). These fine grits can "polish" the surface, making it too smooth for the new paint to properly adhere, potentially leading to poor adhesion, peeling, or lack of durability. For most painting applications, a grit range of 180 to 220 is ideal for final sanding before primer or paint. This creates a sufficient "tooth" or microscopic profile on the surface, allowing the new paint to bond securely. For intermediate sanding between coats of paint, 320 grit is usually the maximum fine grit recommended.

Sanding wood surface with 220 grit before painting.
I’ve learned the hard way that too fine a grit before painting can cause more problems than it solves. It’s a common misconception that the smoother the surface, the better the paint adhesion. While you want smoothness, you also need microscopic "valleys" for the paint to grip onto. Imagine trying to glue something to a pane of glass – it won’t hold well because it’s too smooth. Paint needs a slightly abraded surface to create a strong mechanical bond. For the vast majority of painting projects, whether it’s wood, metal, or primer, I find that 180 to 220 grit is the sweet spot. It smooths out any imperfections from previous sanding steps without making the surface so slick that the paint struggles to stick. If I’m sanding between coats of paint, especially for a very smooth finish, I might go up to 320 grit, but rarely higher. Using 400 or 600 grit before paint is reserved for very specific automotive finishes or polishing clear coats, not for preparing a surface for a base layer of paint. It would be like trying to drive a car with bald tires on ice – you’d just slip. So, stick with 180-220 grit for initial paint prep and save the ultra-fine grits for polishing tasks.
Will 40 grit sandpaper remove paint?
When faced with stubborn, thick layers of old paint, the immediate thought is often to reach for the coarsest grit available. But how effective is 40-grit sandpaper for paint removal, and what are its implications?
Yes, 40-grit sandpaper will aggressively remove paint, often very quickly. It is an extremely coarse grit designed for rapid material removal, leveling uneven surfaces, or stripping heavy coatings. While effective for initial paint removal, especially thick or multiple layers, its aggressiveness means it will leave very deep scratches on the underlying surface. These deep scratches will then require extensive subsequent sanding with progressively finer grits (e.g., 80, 120, 180, 220) to remove, which can be time-consuming and may remove more substrate material than desired. Therefore, 40-grit is best reserved for situations where significant paint removal and subsequent repair of the substrate are expected and necessary, such as restoring very old, heavily painted wood.

40-grit sandpaper rapidly removing paint and leaving deep scratches.
My general approach with 40-grit sandpaper is to treat it like a blunt instrument. It will remove paint, and it will do it fast, but it comes at a cost. Imagine trying to smooth a surface with a rock; it gets the job done, but leaves a mess. For very thick, stubborn layers of paint, like what you find on old trim or furniture that’s been painted dozens of times, 40-grit can be a necessary evil. I use it to quickly get down to the bare wood or metal, but I know I’m creating a lot of work for myself afterward. The deep gouges it leaves need to be meticulously removed by stepping up through the grits: 80, then 120, then 180, and so on. If you skip steps, those 40-grit scratches will show through your new paint or finish, even if they’re not immediately visible before painting. So, while it’s highly effective for aggressive paint removal, I only pull out the 40-grit when absolutely necessary, and only on robust surfaces that can handle the aggressive sanding and subsequent refinement. For most general paint removal, a 60 or 80-grit is often a better starting point, as it’s still aggressive but leaves shallower scratches that are easier to remove. Always remember to wear proper respiratory protection when sanding old paint, especially if lead paint is a possibility.
What is 220 grit sandpaper used for?
Each grit of sandpaper has a specific purpose in the sanding process. Where does 220-grit fit into the sequence, and why is it so commonly recommended?
220-grit sandpaper is primarily used for final smoothing before applying the first coat of primer or paint, or for light scuffing between coats of finish. It creates a very smooth surface while still providing sufficient "tooth" for subsequent coats to adhere properly. For wood, 220-grit effectively removes scratches left by coarser grits (like 120 or 150) and prepares the wood for staining or clear coating, minimizing visible scratch patterns. It’s also excellent for gently sanding away dust nibs, minor imperfections, or leveling slight orange peel texture in cured paint or clear coats, producing a refined, professional finish without over-abrading.

220-grit sandpaper for final smoothing before finishing.
In my finishing process, 220-grit sandpaper is almost always the last step before applying the first coat of primer or clear finish. It’s the point where you transition from shaping and removing defects to truly preparing the surface for its final appearance. When working with wood, I’ll typically progress from, say, 80-grit for initial shaping, to 120-grit to remove those deeper 80-grit scratches, then to 180-grit to refine further, and finally to 220-grit. The 220-grit removes the 180-grit scratches, leaving a super smooth surface that feels great to the touch and allows stains to penetrate evenly or clear coats to lay down flawlessly. For painted surfaces, after applying primer, I’ll often give it a light sanding with 220-grit to knock down any fuzz, dust nibs, or slight imperfections before applying the topcoat. It creates a perfectly prepared canvas. I’ve also found it invaluable for light scuffing between coats of clear finishes, like polyurethane or lacquer, to ensure good inter-coat adhesion and to remove any tiny dust specks that might have settled. It’s a critical step that ensures your hard work in applying the finish isn’t undermined by poor surface prep. NOVOGRIT offers high-quality 220-grit sandpaper that maintains its cut and consistency, making this crucial step reliable.
What grit sandpaper removes the most?
When you need to get rid of a lot of material quickly, choosing the right grit is paramount. So, which grit truly removes the most material?
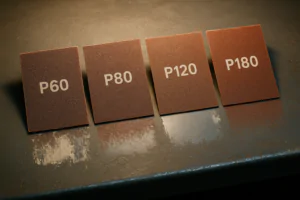
The lower the grit number, the more material the sandpaper will remove. Therefore, the lowest available grit sandpaper (e.g., 36-grit or 40-grit) will remove the most material the fastest. These coarse grits have fewer, larger, and more widely spaced abrasive particles, which allow them to cut aggressively into the surface, making them ideal for heavy stock removal, stripping old, thick finishes, leveling uneven surfaces, or shaping wood quickly. However, they also leave the deepest scratches, requiring subsequent sanding with progressively finer grits to achieve a smooth finish.

Comparison of sandpaper grits from coarse to fine.
It’s a simple inverse relationship: lower number equals more aggressive cut. When I’m working on a project that needs serious material removal – say, rough-shaping a piece of timber, taking down a swollen door, or stripping multiple layers of old paint that are practically cemented on – I reach for the lowest grit I have, usually a 36-grit or 40-grit. These are often made with tough abrasives like Zirconia Alumina or Ceramic, which are designed for heavy-duty work. The large, sharp grains tear through material very effectively. Think of it like a bulldozer; it moves a lot of earth quickly, but it’s not designed for precision landscaping. While these coarse grits are incredibly efficient for initial removal, I always have to remind myself that they are just the first step. The goal is to quickly get to the desired shape or bare surface, knowing that the real work of refining and smoothing will come with the subsequent, finer grits. If you try to jump grits too much (e.g., going straight from 40 to 120), you’ll struggle to remove the deep scratches left by the coarse grit, and they will likely show through your final finish. So, for maximum material removal, go as low as you need on the grit scale, but always plan for the necessary follow-up steps.
Conclusion
For paint removal, use coarse (40-80 grit) Aluminum Oxide or Zirconia Alumina sandpaper, preferably "no-load" to prevent clogging. Avoid 400 or 600 grit before painting, as it’s too fine for proper adhesion; 180-220 grit is ideal. While 40-grit sandpaper removes paint quickly, it leaves deep scratches requiring extensive follow-up. 220-grit is perfect for final smoothing before prime/paint and between coats. Remember, lower grit numbers remove the most material.

You may also be interested in:

What is the difference between zirconium, ceramic, and aluminum oxide abrasives?
Choosing the right abrasive can be confusing. Using the wrong one wastes time, ruins your workpiece, and costs you money. Let’s make the choice simple for you. The main difference

Best Sandpaper for Aluminum: NOVOGRIT's Guide to Flawless Finishes
What is the Best Type of Sandpaper to Use on Aluminum? Do you find yourself frustrated by sandpaper that gums up instantly when you try to smooth aluminum? It is
Best Sandpaper for Paint Removal: Grits, Types, & Tips | NOVOGRIT
What is the Best Sandpaper for Removing Paint? Are you tired of staring at chipped, peeling paint on your furniture, walls, or even your car? It's a common problem, and
Automotive Wet Sanding: Supplies, Liquids & Best Sandpaper
Automotive Wet Sanding Supplies: What Do You Really Need? Wet sanding is a crucial technique in automotive refinishing, used to achieve a flawlessly smooth surface before painting or polishing. Unlike
Hardwood Floor Sanding: Screen vs. Sandpaper & Best Practices
Sanding Screen vs. Sandpaper for Hardwood Floors: Which is Best? When you're tackling hardwood floor projects, choosing the right abrasive is crucial for achieving a smooth, professional finish. Both sanding
Paper Backing vs. Mesh Sanding Discs: Which Abrasive to Choose?
Paper Back vs. Mesh Sanding Discs: Which One Should You Pick? Choosing the right sanding disc backing can significantly impact your project's efficiency and finish quality. Paper-backed discs are a
Sanding Mesh vs Paper: Which is More Economical and Better?
Is Sanding Mesh More Economical Than Sandpaper? Comparing Abrasive Costs When stocking up on abrasives, cost is always a factor. Paper sandpaper has traditionally been the standard, but newer mesh
Sanding Nets & Screens Use Cases: When to Choose Mesh Abrasives
Sanding Nets and Screens: What Are Their Best Use Cases? When you encounter sanding nets or screens, you might wonder where they fit into your sanding projects. Unlike traditional solid-backed
Paper vs. Mesh Sanding Discs: Which Abrasive to Choose?
Paper vs. Mesh Sanding Discs: Which Should You Buy? Choosing the right abrasive disc is essential for efficient and effective sanding. Two primary types dominate the market: traditional paper-backed discs
