
Common Mistakes in Stainless Buffing Process: How to Avoid Them
Buffing stainless steel can achieve a stunning, reflective surface. But it’s also a process where mistakes can easily happen, leading to a less-than-perfect finish, or even damaging the workpiece. Knowing the pitfalls is the first step to avoiding them.
Common mistakes in the stainless steel buffing process include skipping abrasive grits during preparation, using the wrong type of buffing compound or wheel, applying too much pressure, not cleaning the workpiece between steps, and failing to follow the direction of the grain where applicable. These errors can result in visible scratches, uneven finishes, or swirling patterns.

Examples of mistakes like swirl marks on buffed stainless steel.
By understanding these common errors, you can approach your stainless steel buffing projects with confidence and achieve the brilliant shine you’re looking for.
What is the best way to buff up stainless steel?
To get that desirable mirror finish on stainless steel, what is the recommended process to follow?
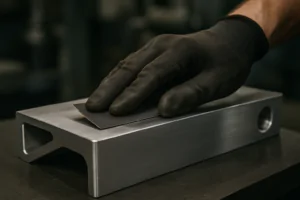
The best way to buff up stainless steel involves starting with a properly prepared surface achieved through progressive sanding with increasingly finer grits, then using the appropriate buffing compounds and wheels in sequence, applying light to moderate pressure, and consistently moving the workpiece against the direction of the buffing wheel’s rotation.

Steps involved in buffing stainless steel to a shine.
Buffing stainless steel is not a single step but a multi-stage process. It begins long before the buffing wheel is even turned on, with the preparation of the surface using abrasives. You must progressively sand the stainless steel, starting with a grit coarse enough to remove any existing scratches or imperfections and moving through a series of finer grits until you reach a very smooth, uniform surface. The final grit used before buffing depends on how mirror-like you want the finish, but typically ranges from 400 grit up to 1000 grit or even higher. Once the surface is properly sanded, you move to buffing. Select a buffing compound suitable for stainless steel (as discussed in a previous topic, white and green are common). Apply the compound to a rotating buffing wheel. Then, carefully bring the workpiece into contact with the spinning wheel, applying light to moderate pressure. It is crucial to move the workpiece constantly and consistently against the direction of the wheel’s rotation. This ensures even material removal and helps prevent swirl marks. Start with a cutting compound and a more aggressive wheel (like sisal or spiral sewn cotton) to refine the surface further, then switch to a finer polishing compound (like green) and a softer wheel (like loose leaf cotton or felt) to achieve the final high gloss. Proper technique, including consistent movement and avoiding too much pressure, is essential for a flawless finish. Using high-quality abrasives like NOVOGRIT film sanding discs in the preparation phase sets you up for success in the subsequent buffing steps.
Which buffing wheel is recommended for stainless steel?
The choice of buffing wheel is as important as the compound used. What types of wheels work best for buffing stainless steel?
Recommended buffing wheels for stainless steel include sisal wheels or spiral sewn cotton wheels for initial cutting and removing scratches, and loose leaf cotton wheels or felt wheels for final polishing and achieving a high-gloss or mirror finish. The choice depends on the stage of the buffing process and the desired aggression level.

Various buffing wheels used for metal polishing.
Buffing wheels are made from different materials and constructed in various ways to provide different levels of hardness and aggression. For the initial stages of buffing stainless steel, particularly if you need to remove sanding marks from coarser grits or minor surface imperfections, you need a wheel that provides good cutting action when combined with a cutting compound. Sisal wheels, made from natural fibers, are quite aggressive and good for initial cutting. Spiral sewn cotton wheels, where layers of cotton fabric are stitched together in a spiral pattern, are also relatively firm and work well with cutting compounds to smooth the surface. As you move to finer polishing stages to achieve a higher shine, you need softer wheels that can apply the finer polishing compounds effectively without introducing new scratches. Loose leaf cotton wheels, made from layers of cotton fabric that are not sewn together (or only sewn around the arbor hole), are softer and more flexible, making them ideal for final polishing. Felt wheels are also used for achieving a very high polish, offering a dense but smooth surface for the fine abrasive particles in the polishing compound. The diameter and thickness of the wheel also affect its performance and suitability for different tasks and buffing machines. Matching the wheel type to the buffing compound and the stage of the process is crucial for achieving optimal results on stainless steel.
What grit for polishing stainless steel?
When preparing stainless steel for polishing or buffing, what range of abrasive grits should you use?
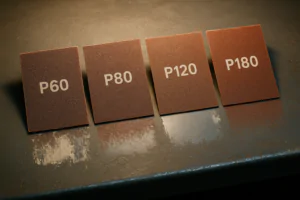
For polishing stainless steel, you should typically use a sequence of progressively finer abrasive grits, starting coarse enough to remove imperfections and finishing with very fine grits, usually ranging from 400 grit up to 1000 grit or even finer. The final grit depends on whether you are preparing for a brushed finish or a high-gloss buff.

Progression of abrasive grits for polishing stainless steel.
The term "polishing" can sometimes be used broadly to include both the abrasive sanding steps and the final buffing with compounds. If we are talking specifically about the abrasive grits used before buffing, the required range depends heavily on the starting condition of the stainless steel and the desired final appearance. If you’re dealing with mill finish stainless steel or a surface with significant scratches, you might start with a relatively coarse grit, perhaps 80 or 120, to level the surface. From there, you must work through a series of progressively finer grits. A typical sequence for preparing for a brushed finish might go up to 320 or 400 grit. For preparing for a high-gloss or mirror buffed finish, you need to go significantly finer to remove the sanding marks left by the previous grits. You might progress through 400, 600, 800, and 1000 grit, or even higher (e.g., 1500 or 2000) depending on how critical the final finish is and the capability of your buffing setup. Each successive grit refines the scratch pattern left by the previous one, making it less visible. The surface must be completely free of scratches from the previous grit before moving to the next. Using high-quality abrasives designed for metal, like NOVOGRIT film sanding discs, is essential because they provide consistent scratch patterns and cut efficiently, making the progression through grits smoother and more effective. The finer the final grit used before buffing, the less work the buffing compounds and wheels have to do to achieve a mirror finish.
What is the difference between buffing compound and polishing compound?
The terms "buffing compound" and "polishing compound" are often used interchangeably. Is there a distinction, and if so, what is it?
While often used loosely, in a more precise context, "buffing compound" typically refers to more aggressive compounds used in the initial stages of the buffing process to cut and remove surface imperfections, while "polishing compound" refers to finer compounds used in the later stages to refine the surface and achieve a high-gloss or mirror finish.

Distinction between cutting and polishing compounds.
This distinction relates to the size and type of abrasive particles contained within the compound. Compounds are essentially a mixture of very fine abrasive particles embedded in a wax, grease, or oil binder that allows them to be applied to a buffing wheel. "Cutting compounds" or "buffing compounds" contain larger, more aggressive abrasive particles designed to level the surface, remove sanding marks from the preceding abrasive steps, and eliminate minor scratches or pits. These are used with firmer buffing wheels to provide the necessary cutting action. Common colors for cutting compounds for stainless steel include black (often very aggressive), brown, or white. "Polishing compounds" or "coloring compounds" contain much finer abrasive particles. Their purpose is not to remove significant material but to reduce the microscopic scratch pattern left by the cutting compound and bring the surface to a high luster or mirror finish. They "color" the surface by bringing out its reflective qualities. Green chromium oxide compound is a classic example of a fine polishing/coloring compound for stainless steel. These are used with softer buffing wheels that conform to the surface and apply the fine abrasive evenly. While the terms are often used interchangeably, understanding this difference helps in selecting the right compound for each stage of the multi-step buffing process needed to achieve different finishes on stainless steel.
Conclusion
Avoiding common mistakes like skipping grits, using the wrong compounds or wheels, and improper technique is key to successful stainless steel buffing. The best approach involves careful surface preparation with progressive sanding, followed by using appropriate buffing compounds and wheels in sequence for a brilliant, smooth finish.

You may also be interested in:

What is the difference between zirconium, ceramic, and aluminum oxide abrasives?
Choosing the right abrasive can be confusing. Using the wrong one wastes time, ruins your workpiece, and costs you money. Let’s make the choice simple for you. The main difference

Best Sandpaper for Aluminum: NOVOGRIT's Guide to Flawless Finishes
What is the Best Type of Sandpaper to Use on Aluminum? Do you find yourself frustrated by sandpaper that gums up instantly when you try to smooth aluminum? It is
Best Sandpaper for Paint Removal: Grits, Types, & Tips | NOVOGRIT
What is the Best Sandpaper for Removing Paint? Are you tired of staring at chipped, peeling paint on your furniture, walls, or even your car? It's a common problem, and
Automotive Wet Sanding: Supplies, Liquids & Best Sandpaper
Automotive Wet Sanding Supplies: What Do You Really Need? Wet sanding is a crucial technique in automotive refinishing, used to achieve a flawlessly smooth surface before painting or polishing. Unlike
Best Sandpaper for Paint Removal & Grit Guide
What Is the Best Sandpaper for Removing Paint? Removing old paint can be a tedious job, but using the right sandpaper makes all the difference. It's not just about grit;
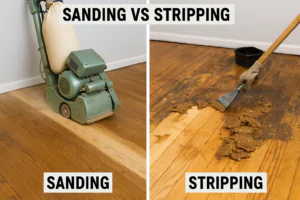
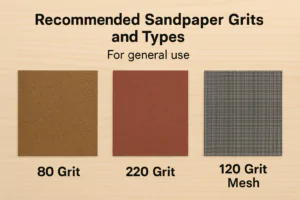
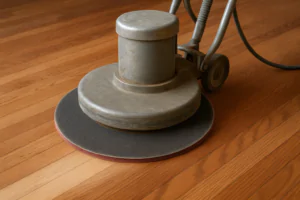
Hardwood Floor Sanding: Screen vs. Sandpaper & Best Practices
Sanding Screen vs. Sandpaper for Hardwood Floors: Which is Best? When you're tackling hardwood floor projects, choosing the right abrasive is crucial for achieving a smooth, professional finish. Both sanding
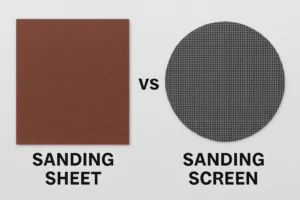
Paper Backing vs. Mesh Sanding Discs: Which Abrasive to Choose?
Paper Back vs. Mesh Sanding Discs: Which One Should You Pick? Choosing the right sanding disc backing can significantly impact your project's efficiency and finish quality. Paper-backed discs are a
Sanding Mesh vs Paper: Which is More Economical and Better?
Is Sanding Mesh More Economical Than Sandpaper? Comparing Abrasive Costs When stocking up on abrasives, cost is always a factor. Paper sandpaper has traditionally been the standard, but newer mesh
Sanding Nets & Screens Use Cases: When to Choose Mesh Abrasives
Sanding Nets and Screens: What Are Their Best Use Cases? When you encounter sanding nets or screens, you might wonder where they fit into your sanding projects. Unlike traditional solid-backed
